Searching
There are two ways to find records in Linea Codex, and they answer two different questions. The
quick search box at the top of the tree is for jumping to a record you can
already half-name — type a few letters and the list narrows. Advanced search is for finding
records by criteria you describe: everyone with a BIRT that has no DATE, every FILE whose value
matches a pattern, every note used as a top-level record. This page covers both.
Quick search: type to filter
Section titled “Quick search: type to filter”A search box (placeholder Search records…) sits at the top of the tree. Start typing and the list filters as you go, automatically expanding to reveal the matches. It searches more than just names:
- Record labels — the name or summary shown on each row (a person’s name, a source title, and so on).
- Cross-reference IDs — the record’s own xref, so typing
@I937@(or justI937) jumps straight to it. - Deep record text — values buried inside a record, not only its top line. Searching
Londonfinds a person whose only mention of it is aPLACunder a residence event.
Matching is case-insensitive and accent-folded, so muller finds Müller without you typing the
umlaut. Results are ranked, with xref matches first, then label matches, then deeper text matches.
In the Raw perspective the search also matches the structural TAG XREF VALUE line, so you can
search by tag there; in the everyday Grouped perspective it matches names, ids, and deep text as
above.
Press Esc while the box has focus, or click the clear (✕) button beside it, to reset the filter. If nothing matches you’ll see No matching records found.
Advanced search: find by condition
Section titled “Advanced search: find by condition”When you need records that share a shape rather than a name, open advanced search. Two ways in:
- Click the adjustments icon beside the quick search box (Open advanced search).
- Or use the menu bar: Edit → Advanced search…
Both open the Advanced search dialog. Neither has a keyboard shortcut.
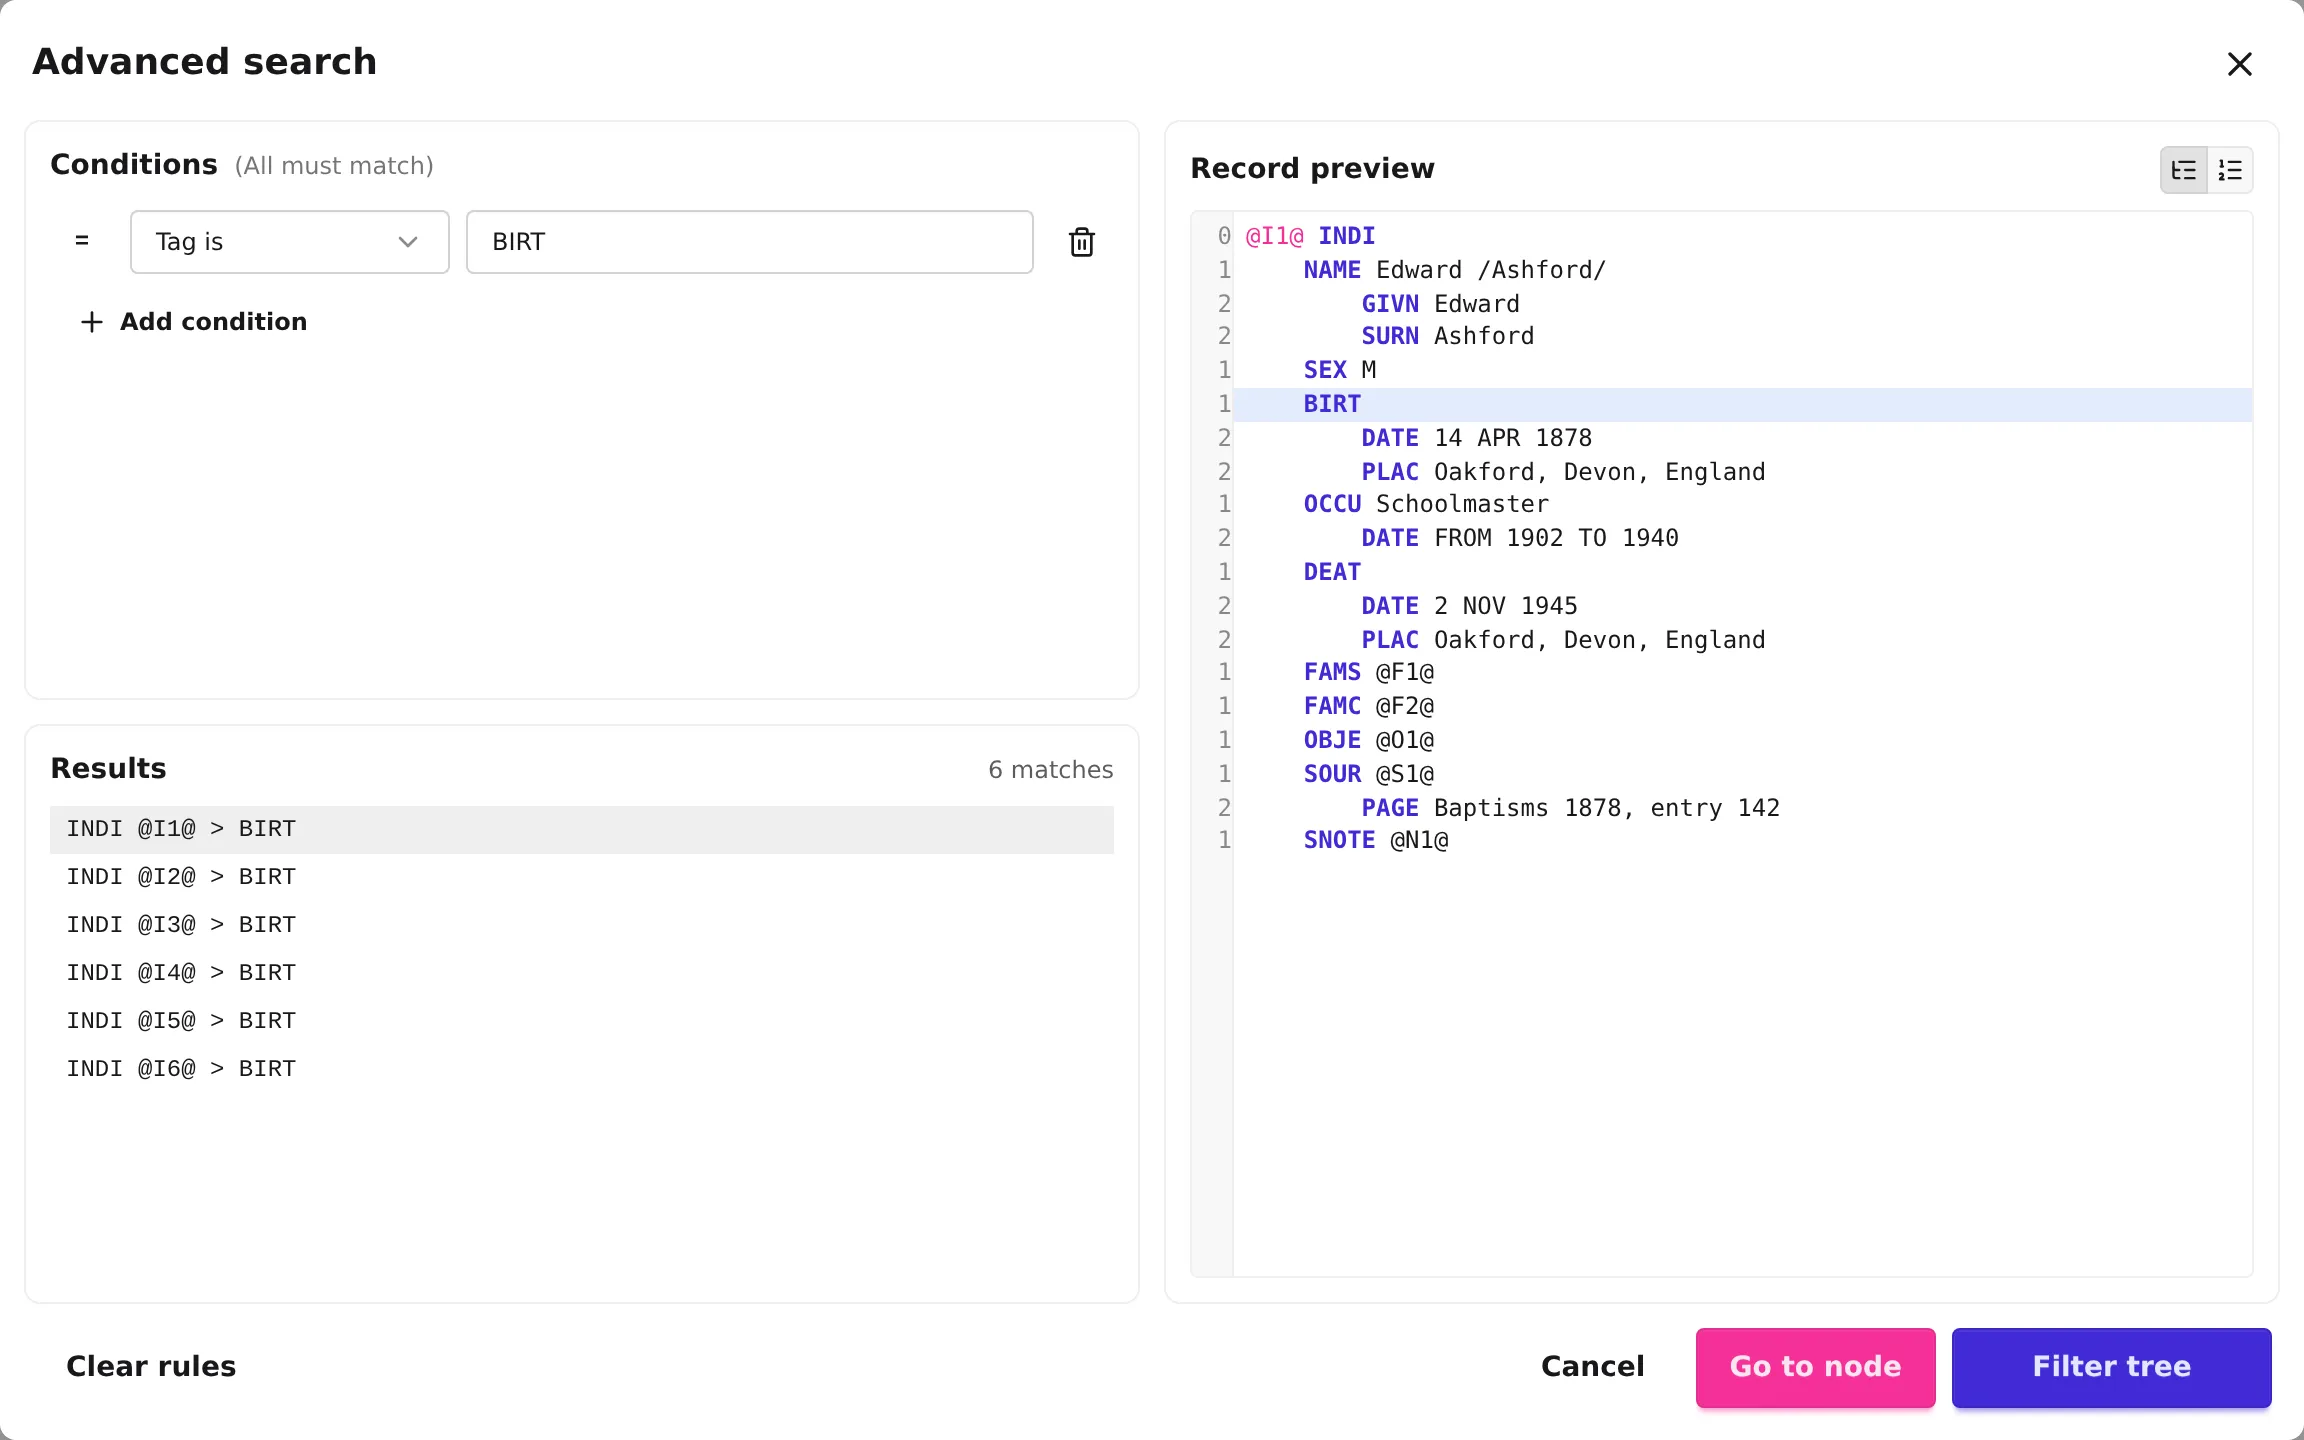
Building conditions
Section titled “Building conditions”You describe what to match by adding one or more conditions (the heading reads Conditions, with the hint All must match — every condition you add is combined with AND). Each condition is a row with a kind and, for most kinds, a value to fill in:
| Condition | Label in the app | What it matches |
|---|---|---|
| Tag is | Tag is | A node whose tag is exactly what you type — e.g. BIRT, NAME, FILE. |
| Has a value | Has a value | Any node that carries a value at all (no value to fill in). |
| Value matches | Value matches | A node whose value matches a regular expression — e.g. ^\d{4}$ for a bare four-digit year. |
| Has child | Has child | A node that has a direct child with the tag you name — e.g. a BIRT that has child DATE. |
| Parent tag is | Parent tag is | A node whose immediate parent has the tag you name — e.g. a DATE whose parent tag is BIRT. |
Each row has a small = / ≠ toggle in front of it. Flip it to ≠ to negate the condition — must
NOT match — so you can search for, say, a BIRT that does not have child DATE to find births
missing a date.
Click Add condition to stack more rows. Because they combine with AND, three rows describe a
narrow, specific target: Tag is BIRT and has child PLAC and ≠ has child DATE finds every
birth event that records a place but no date.
Reading the results
Section titled “Reading the results”As you build conditions, the dialog searches live (with a short debounce) and fills in:
- Results — a count (N matches) and a sample list of matched nodes, each shown as its path. The list is capped at a sample; if there are more you’ll see + N not shown — narrow your search. Before you’ve added a usable condition it reads Add a condition to start; when nothing matches, No nodes match.
- Record preview — click a result and the containing record is rendered on the right with the matched line highlighted, so you can confirm it’s what you meant. A structured/raw toggle above the preview switches how it’s shown.
Acting on the results
Section titled “Acting on the results”The bar at the bottom of the dialog offers four actions:
- Clear rules — empties the condition builder and starts over.
- Cancel — closes the dialog without changing the tree.
- Go to node — closes the dialog and selects the matched node you picked in the results list, scrolling the tree to it. (Double-clicking a result does the same.)
- Filter tree — applies the conditions as a filter on the tree itself: the tree collapses to just the matched records (and their ancestors), so you can browse the whole result set in place. The dialog closes.
The active-filter strip, and clearing it
Section titled “The active-filter strip, and clearing it”After Filter tree, a status strip appears under the tree’s search box reading Advanced search · N shown, and the advanced-search icon shows as pressed. Browse the filtered tree as usual; to lift the filter, click the ✕ on that strip (Clear advanced search). Re-opening the dialog restores the conditions you last used, so you can refine and re-apply.
If you Go to node while a filter is active — or follow a link to a record that the filter would hide — Linea Codex clears the filter so the record is reachable, and shows a brief toast (Advanced filter cleared to show this node) with a Restore action to put the filter back. When both a text filter and an advanced filter are clearing at once, it offers Restore both.